What Are Website-Based Workflows?
Website-Based Workflows use website activity as their data source to automatically manage account segments based on how they interact with your website. They allow you to track meaningful on-site behaviour such as page visits or visit frequency. That engagement data is then used to add, move, or remove accounts from segments. This ensures your segmentation and targeting reflect real-time buyer interest, without manual updates.
Website-Based workflows are often used to spot accounts that are starting to show interest, becoming more intent-driven, or signalling they may be ready for a sales conversation. Because these workflows respond automatically to real website activity, teams can stay in sync with how accounts are actually engaging. This can make it easier to tailor ads, outreach, and nurture campaigns to the right stage of the buying journey.
How to Create Website-Based Workflow
To use your website as a data source, you need to have the N.Rich website tag installed and the standard mode tracking enabled. Please review our N.Rich Website Tag Installation article for information to set this up.
-
Navigate to the Workflow tab.
-
Click on + Create workflow.
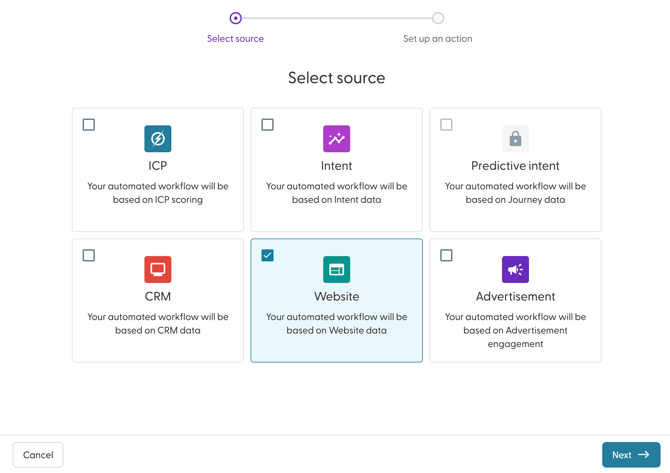
- Select Website and click on Next.
- Enter a name for your Workflow. Best practice is to use a descriptive name that summarises what the workflow does.
- Next, choose the number of visits that should occur from the drop-down for the Workflow to be triggered. You can choose from:
- 1 or more times to 5 or more times
- 2 or less times to 5 or less times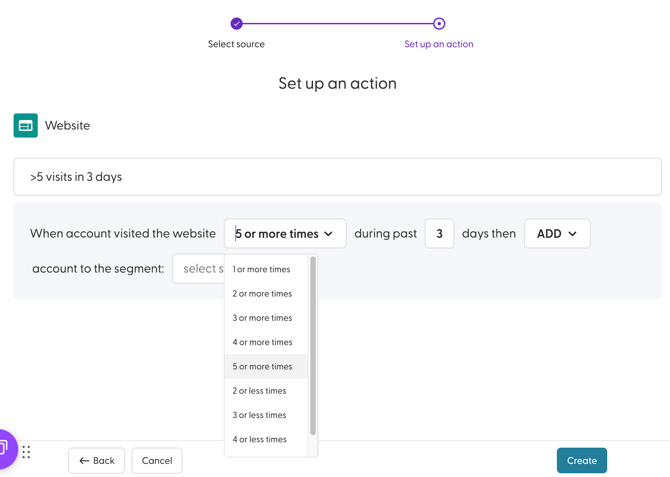
- Set the “during the past X days” timeframe to define how recent the website activity must be for the workflow to trigger. You can choose from 0 to 90 days.

- Choose action that should be taken. You can choose to either add, move or remove.
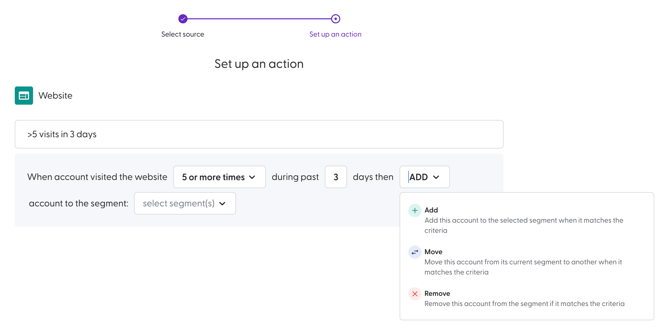
Here is a detailed description of what each action does:
Action Description Add The workflow adds an account that matches the trigger conditions to the destination segment(s). Move The workflow moves an account that matches the trigger conditions from the source segment(s) to the destination segment(s). Remove The workflow removes an account that matches the trigger conditions from the source
- Next, select the segment(s) that should be updated by the Workflow. There is no limit to the number of segments that you can choose here. You can also create a segment from this modal as well.
If you choose the action to move an accounts from one segment to another, you will be required to choose the segment(s) that they should be moved from and the segment(s) that they should be moved to.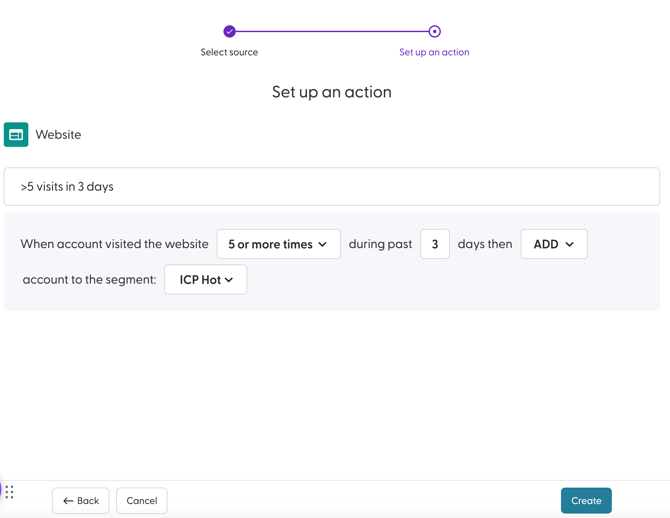

- Click Create to complete the creation process.
The Workflow will be active by default once created. Additionally, workflows are executed at least once per day. They can be executed multiple times per day, depending on the data source.
Use Case for Website-Based Workflows
Populate a Retargeting Segment with Highly Engaged Website Accounts
You may need to retarget accounts to re-engage interested buyers, reinforce your message, and move high-intent accounts further along the buying journey.
Website-based workflows allow you to automatically identify accounts that are actively engaging with your website and group them into a retargeting segment. This ensures your retargeting campaigns focus on accounts showing strong interest, rather than all website visitors.
Goal
-
Identify accounts with high website engagement
- Automatically populate a retargeting segment
-
Keep retargeting audiences updated based on recent behavior
-
Align advertising spend with real buying signals
Step 1: Confirm Website Tracking Is Enabled
Before creating workflows, please ensure that:
-
The N.Rich website tracking script is installed on your website.
-
Website activity is being captured at the account level.
Step 2: Create a Retargeting Segment
Create a segment that will be used for retargeting campaigns.
Example segment name:
-
Website Engaged – Retargeting
Step 4: Define Website Engagement Conditions
Set the rules that define “high engagement.”
Example conditions:
-
Account has visited key pages (e.g. product, pricing, or solution pages)
-
Number of website visits is greater than or equal to 3.
-
Activity occurred during the past 7 days
(You can select a time range between 0 and 90 days)
Step 5: Define the Workflow Action
Action: Add account to the segment: Website Engaged: Retargeting
Step 6: Use the Segment in Retargeting Campaigns
Use the Website Engaged – Retargeting segment as the audience for:
-
Display advertising
- Paid social campaigns
- ABM retargeting initiatives
This ensures your campaigns focus on accounts with recent, high-intent website engagement.